Tips And Tricks
This is a collection of things that I found useful either from other users or myself along the way. Hope they help.
Random Building Tips
This is a big project, so any little thing that helps can make a big difference. Here's a few random things that helped me.
This is a big project, so any little thing that helps can make a big difference. Here's a few random things that helped me.
- Buy a highlighter and use it to mark off steps that are completed in the plans. People get worried about marking up the plans, but if you're truly committed then it shouldn't matter. This way, if you skip around, you'll know exactly what's done and what needs finishing. Don't mark off things that are curing as you may find you have to do it over again. Only mark when it's done.
- Write down changes in the plans, such as the 6.25 inch reference for F28. Again, don't have fears of writing in the plans. The notes will help if you ever have to refer back to something down the road.
- Buy some Post-it notes and write down tips that you come across and post them on the pages where they apply. This way you don't have to remember it when the time comes around and you can decide if it's something you want to do then or stick to the plans.
- Go to Marc's site and get all the updates for the plans. The Newsletter page has listings for corrections for all sets of plans. Print them out and tape them in their respective places in the plans.
- Store your glass on a rack that can be enclosed to keep it clean. This will make it easier to get your glass and keeping it clean is vital to good layups. Use disposable gloves when handling the glass to help keep it clean as well.
- Get a fabric tracing wheel. It's a small device with a metal wheel on one end with teeth. This is used to trace patterns onto fabric. It works well for tracing images onto foam as well. You trace over the paper while it's on the foam and it'll leave a series of indentations. You can run a pen along the line to make it easier to see, but it's surprisingly easy to see as is. You now have a line to follow to cut out the foam with.
- Keep a stock of clear mailing tape for taping off areas to protect from epoxy. Small plastic sandwich bags are good for making piping bags to apply material like micro or flox.
Working With Fiberglass
Fiberglass has its challenges when working with it. These are a few things that I've been able to pick up along the way that have helped considerably.
Fiberglass has its challenges when working with it. These are a few things that I've been able to pick up along the way that have helped considerably.
- Make sure the temperature in the room will remain at 70 - 80 F during the entire glassing and while curing. Many have been caught off guard (myself included) and the end result is usually lots of bubbles in the layup afterwards which dictates scrapping the part and starting over or large repairs. Check chapter 5 for my mistake in this. During post cure, it's best to leave the temp in the room the same as the working temp and allow it to harden before increasing temp. There's several times I thought I had all the air out only to come back and find large bubbles. If I don't increase the temp much, this doesn't appear to happen. Once the epoxy has hardened, the temp can then be increased for faster cure.
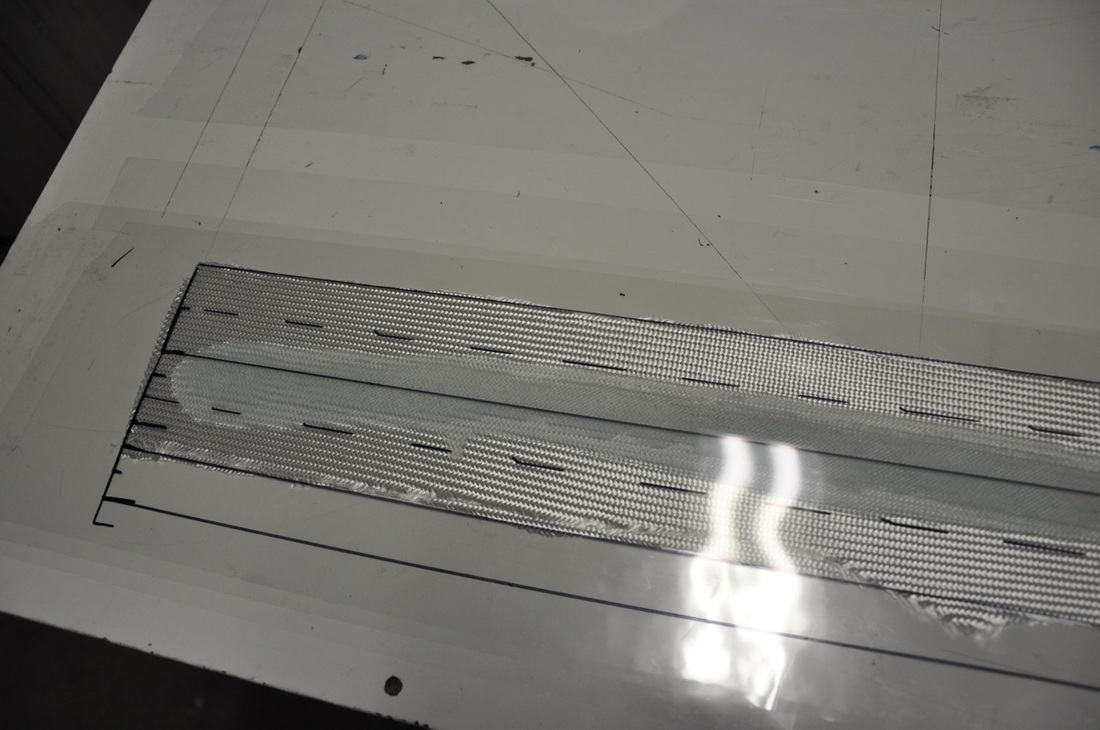
- When working with strips of UNI that are not the full width, the edges will easily string off because the selvage is no longer present. To avoid the stringies, use the following method:
- Take 1 inch masking tape and press it down onto the glass along the line you plan to cut. Make sure that you're leaving some excess glass so this can be trimmed later.
- Cut through the middle of the tape. The masking tape will maintain the integrity of the glass while handling.
- Place the glass where you need it, then trim off the excess glass with the tape.
- You will have your UNI glass laid out with the minimal of unraveling.
- To better set pieces of glass without getting them deformed, it's easier to take a flat smooth piece of material (masonite, plexiglass, etc...) and lay the glass onto the surface, then proceed to straighten it out on there leaving part of the glass hanging off one edge. When it's perfectly square, wet out the surface that the glass is going on, then place the edge of the glass that's hanging off onto the wet epoxy, let it soak up some, then slowly allow the glass to slide off onto the piece. This will make the least amount of work that has to be done once the glass is down to straighten it (believe me, it's much harder once it gets wet).
- Over-size your glass cuts. I don't know how many times I've had a heck of a time because the piece I originally cut seemed to shrink when it came time to layup pieces, and the piece was originally over-sized! It's better to buy more fiberglass than to spend the time and effort trying to fix an undersized piece making a mess of the layup.
- Keep the fiberglass as clean as possible. Contamination can inhibit wetting out the glass and make for weaker bonds. Wearing disposable gloves when handling glass will help.
- Micro can be mixed drier than the plans instructs. It should still be wet enough to spread, but the extra micro will lighten the covering more. The only exception appears to be PVC foam. This foam prefers to have wetter micro for an unknown reason. Using drier micro causes small bubbles to form all over and adhesion issues with the surface. This could just be me, but when I made my micro wetter I had less issues than when dry and was only an issue on PVC foam.
- Always lay up glass one layer at a time when applying to foam. Trying to wet two layers at once is typically disastrous and ends up with lots of trapped air, dry glass, and will likely have to be ripped out and repaired. When doing the BID tape method, several layers are able to be wetted at one time since the plastic forces the epoxy into the fabric.
- BID glass will quite commonly be cut at 45 degree angles. For this glass, just always cut at that angle unless you're doing a large square piece (not many are this way). I drew 45 angles on my cutting board that I can mostly see through the material. I then line up the weave so that the angle of the weave and the line match up, then cut the material.
- To wet glass out with the least amount of trouble, pour a batch of epoxy as soon as it's mixed together and spread out before working it in. The resin will be at its lowest viscosity and it'll almost absorb on its own. I was working hard to wet out an area and noticed the resin was setting up fast. Freaked out about another section, I quickly mixed up a batch and spread it out on another section before the bottom layer was not longer able to be bonded to. To my amazement, that area wetted out faster than the one I was working on.
- The best way to work resin in and remove air is to squeegee. I use a squeegee for most of the layup. Work in the directions of the fibers to avoid distortion and to better work the resin in. It's generally best to work from a middle area outward. Use a brush when you have vertical areas that would be hard to squeegee epoxy onto without dripping a lot. A brush will also help out with those stubborn air bubbles that aren't coming out otherwise. Like the squeegee, just brush fresh epoxy onto the surface and come back after you get all the surface. A lot of times the epoxy will self wet out the glass if you get it on soon enough making your life so much easier.
- A hair drier can help to wet out stubborn areas by warming up local areas. If you have a spot that's not wetting out well, sometimes a little extra heat will help.
- Don't mix too large of a batch of epoxy. I limit myself to under 200 grams per batch. There's a point where if you make a batch big enough, it will exotherm easily. When making flox or micro, reduce the amount even more. I don't make more than 100 grams of epoxy for a micro batch. The glass spheres act as little insulating surfaces, so heat seems to build up quickly. Just mix and get spread out as soon as possible to avoid problems.
Plastic Peel Ply
This is a method that I got from John Slade's site. Basically, this involves using a sheet of plastic over the finished layup while it's still wet to then squeegee the excess epoxy out. This does a couple of things. One, it helps to remove a lot of the trapped air in the lay-up without allowing it back in. Two, it creates a smooth surface rather than leaving the weave texture surface you normally get. This makes finishing the plane later much easier. The technique also allows parts to be made approaching the lower weights obtained by vacuum bagging. It also tends to remove many of the pinholes that can be present in a standard lay-up (this will be good for gas tank construction). What's the down side? Well, it's extra material to use, an extra step in the process, and the smooth surface must be sanded before more fiberglass can bond to it. Peel Ply does similar effects (smooth surface, removes excess epoxy), but it leaves the surface ready to bond more glass. However, because the fabric is porous it doesn't reach the same weight savings as the plastic though it can still get close. It can be more difficult to see smaller air bubbles in the layup especially if they're below the surface. I can see bubbles all the way to the foam through plastic, but peel ply will look fine until I see small trapped air after removing it (this mostly applies to multilayer items as bubbles are easier to see in the first ply). The type of plastic used makes a difference as well. I started out with the standard plastic rolls you find at home improvement stores. They're typically 4 or 6 mil, not completely transparent, and tend to not be the smoothest, but they do work. I later switched to rolls of Mylar because it's completely transparent and has a very smooth surface. It's thinner, so when I overlap sections the interface line between the sheets is very small and will be easy to deal with during finishing. I also had an easier time getting air out because I could see it better. You can order Mylar, or if you can find someone who uses a rolled product that has a Mylar backing you could get the leftover backing material. Another option appears to be clear gift wrapping that can be purchased fairly inexpensively. The process involves the following:
This is a method that I got from John Slade's site. Basically, this involves using a sheet of plastic over the finished layup while it's still wet to then squeegee the excess epoxy out. This does a couple of things. One, it helps to remove a lot of the trapped air in the lay-up without allowing it back in. Two, it creates a smooth surface rather than leaving the weave texture surface you normally get. This makes finishing the plane later much easier. The technique also allows parts to be made approaching the lower weights obtained by vacuum bagging. It also tends to remove many of the pinholes that can be present in a standard lay-up (this will be good for gas tank construction). What's the down side? Well, it's extra material to use, an extra step in the process, and the smooth surface must be sanded before more fiberglass can bond to it. Peel Ply does similar effects (smooth surface, removes excess epoxy), but it leaves the surface ready to bond more glass. However, because the fabric is porous it doesn't reach the same weight savings as the plastic though it can still get close. It can be more difficult to see smaller air bubbles in the layup especially if they're below the surface. I can see bubbles all the way to the foam through plastic, but peel ply will look fine until I see small trapped air after removing it (this mostly applies to multilayer items as bubbles are easier to see in the first ply). The type of plastic used makes a difference as well. I started out with the standard plastic rolls you find at home improvement stores. They're typically 4 or 6 mil, not completely transparent, and tend to not be the smoothest, but they do work. I later switched to rolls of Mylar because it's completely transparent and has a very smooth surface. It's thinner, so when I overlap sections the interface line between the sheets is very small and will be easy to deal with during finishing. I also had an easier time getting air out because I could see it better. You can order Mylar, or if you can find someone who uses a rolled product that has a Mylar backing you could get the leftover backing material. Another option appears to be clear gift wrapping that can be purchased fairly inexpensively. The process involves the following:
- Do the lay-up as normal finishing the last layer. Note that for larger pieces, you'll have to work in patches of areas or the epoxy might set too much to work correctly.
- Lay a sheet of plastic over the finished area. Starting from the middle and using light pressure, squeegee from the center outward using a slow speed. It's best to squeegee in the direction of the fibers. You will see a ridge of epoxy develop at the front end of the squeegee and the air bubbles will ride out along with it. It will also become easier to see trapped air in the lay-up.
- Continue to work till the plastic is all the way flattened out. Note that curved pieces will have difficulty working properly and several sheets may need to be used to get the plastic to conform to the surface.
- Be careful not to squeegee too hard or air can develop in the lay-up from pulling it out of the foam. If you squeegee an area and a bubble immediately forms, you likely pushed too much out. Just add some epoxy back in and start over.
- Note that if the area needs to be glassed over after cure, the plastic can be cut at the edge of the bond area and Peel Ply (dacron fabric strips) can then be used to finish out the area. This will smooth out the weave but leave a rough texture to allow bonding another layer.
- Leave on and allow to cure. The plastic will pull right up leaving you a wonderful looking smooth surface with hopefully the right amount of epoxy and maybe even lighter than a normal layup.
- If extra layers must be bonded to the layup, make sure it's sanded to remove the smooth texture.
Another method can be done where you can use the plastic to squeeze out the air, then pull the plastic off parallel to the surface to avoid pulling up the layup, stipple down any loose areas, then cover with peel ply. This will get a fairly light layup with minimal air and still leaves a rough surface for bonding to. I found this useful for some areas as peel ply is harder to see air within layers of fiberglass (easy to see surface air though) but the plans called out for a peel ply surface.
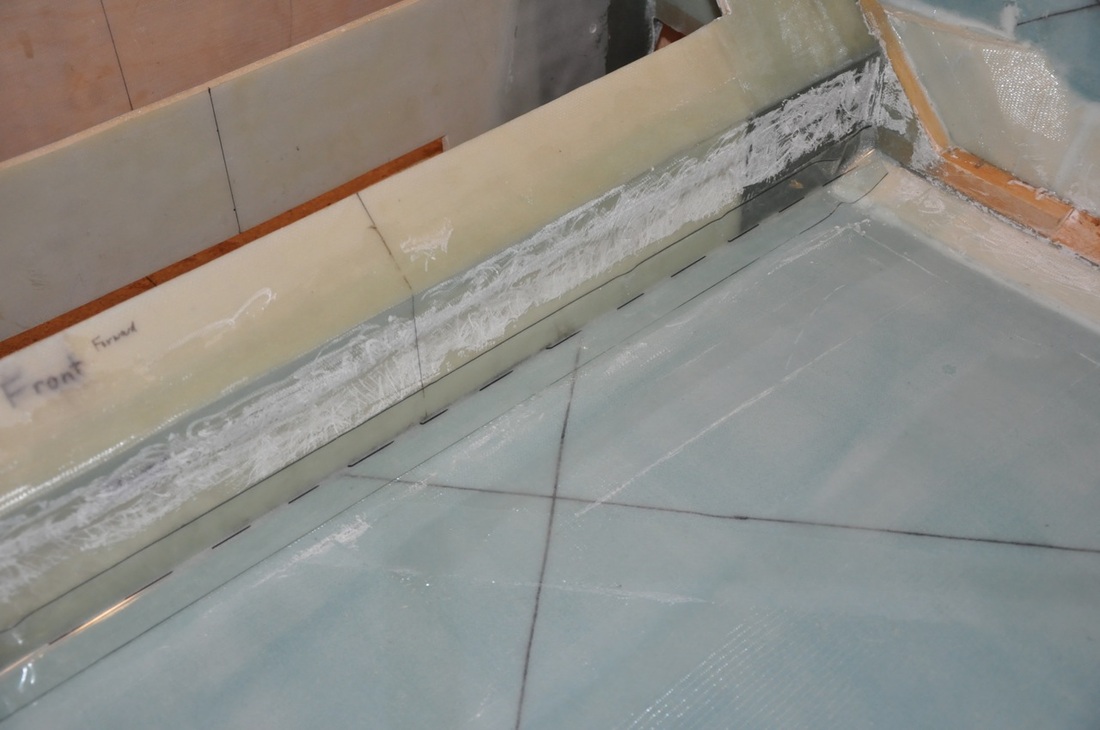
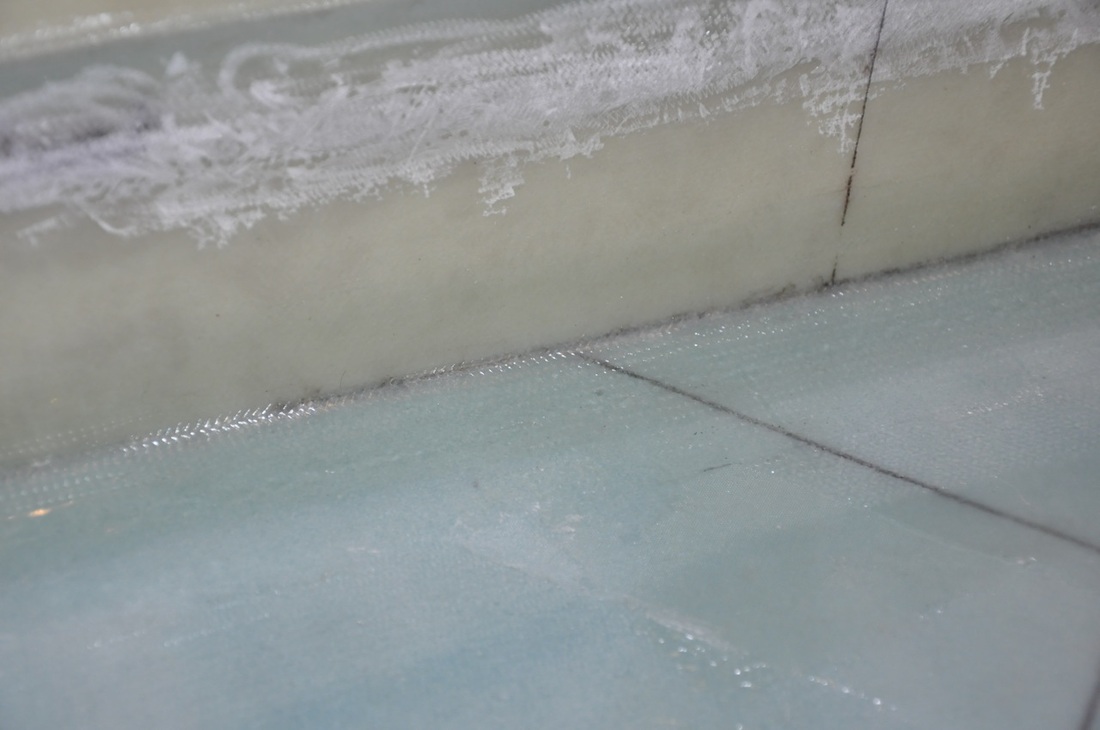
BID Taping / Re-enforcement layups
A neat trick that helps with BID taping and some smaller layups such as the landing gear layup is to sandwich it between plastic. Basic construction practice is as follows:
A neat trick that helps with BID taping and some smaller layups such as the landing gear layup is to sandwich it between plastic. Basic construction practice is as follows:
- Lay down a sheet of plastic. You can draw the outlines of the layup you need to do on the side facing down.
- Place the fiberglass on top, wet out as normal.
- Place a second sheet of plastic on top. Squeegee the air and excess epoxy out. The glass won't move much because it's encapsulated between two sheets of plastic.
- Use a good set of scissors and cut out the fabric to the pattern drawn on the back.
- You now have a strip of wetted fabric that is kept protected from distortion by the plastic. This gets taken over to the layup site, add extra epoxy to the surface of the site, then peel one side of the plastic away and press the glass into place.
- Peel the other side away and then carefully work the air out and remove excess epoxy. Use peel ply where needed. Done right, the tape will be very straight with minimal issues.


Tracing M-Drawings
There are two ways to get your full size M-Drawings: Trace out the other side from the half drawings or pay for the full size M-Drawings. I chose to trace out mine. Supposedly, the full size copies aren't exactly the right size, but many have made them work. Tracing isn't too hard and it gives you a chance to really study the drawings. By tracing the drawings, you retain a copy for reference or if you need to do some parts over. There are a lot of details on some of the drawings that aren't used until later, so it's good to have a reference. The tracing will also give you one piece that you can easily see the lines on which will simplify the pattern transfer. Here's how I traced mine out.
There are two ways to get your full size M-Drawings: Trace out the other side from the half drawings or pay for the full size M-Drawings. I chose to trace out mine. Supposedly, the full size copies aren't exactly the right size, but many have made them work. Tracing isn't too hard and it gives you a chance to really study the drawings. By tracing the drawings, you retain a copy for reference or if you need to do some parts over. There are a lot of details on some of the drawings that aren't used until later, so it's good to have a reference. The tracing will also give you one piece that you can easily see the lines on which will simplify the pattern transfer. Here's how I traced mine out.
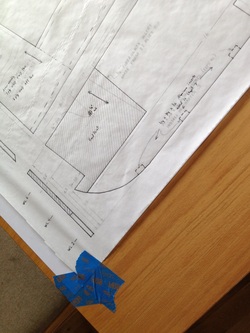
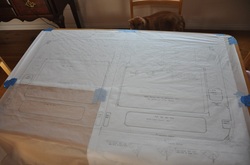
- Buy some blue painters tape (easy release). Use this to tape down the M-drawing to a flat surface making sure to get it as flat and tight as possible. It's usually best to tape one corner, then tape the corner diagonally across from the first pulling the paper tight. Then repeat with the other two corners. Adjust as needed to get as much wrinkle out of the paper.
- For drawings that are only half sheets, verify that the center line is where it says it is. My lower firewall image had a marking of 7.5 inches, but when I checked it the length was 7.8 which meant the centerline was not where it should have been either. I've learned that written dimension always seem more accurate than the drawn dimensions. So a new centerline was drawn. Also, the centerline was not perfectly vertical with the horizontal lines. Double check things.
- Buy a roll of tracing paper, the larger the better. Most likely, you'll have to tape two pieces together to get the full height on large pieces like the IP or firewall.
- Roll out a piece the entire length of the M-drawing and then some extra. Line up the top edge of the tracing paper with the top edge of the M-drawing paper. This will help with alignment. If the M-drawing is only half the image, you will want to roll the tracing paper out twice the length.
- Tape the tracing paper down similarly to the M drawing.
- If you find you're coming up with wrinkles while working out an area that already has tape, the blue tape allows re-positioning without too much hassle.
- Start tracing out lines, measurement markings, etc... The more details, the better.
- Use a long ruler to make sure all straight lines remain that way across the drawing.
- To do the mirror copy, I drew the vertical reference line and continued any horizontal lines that intersect the vertical line. Then I fold the paper over placing the crease right on the vertical reference line using the horizontal lines to double check the alignment. Using the top edge to line up and the horizontal lines that were extended, the paper can be lined up very well for the other copy. I then trace out the mirror image on the the folded paper (note that this side will be the backside, so your tracing will be on the opposite side of the paper as the first, but since the paper is see through it won't be an issue).
- Carefully remove the tape after you're finished and you have a copy that can be mangled up without damaging the first.
Plastic Sandwich Bags
Go to Costco and stock up on a case of these. They are very useful for applying 5 minute epoxy to join foam boards, to squeeze micro into corners for fillets, and to add flox or micro to join pieces with. The basic idea is to cut the tip off of a bag filled with your material of choice, then you can squeeze it out in a neat line, much like icing a cake with an icing bag and tip. They keep the mess down and, control the application of the material, and can then be thrown away when done. Works wonderfully.
Go to Costco and stock up on a case of these. They are very useful for applying 5 minute epoxy to join foam boards, to squeeze micro into corners for fillets, and to add flox or micro to join pieces with. The basic idea is to cut the tip off of a bag filled with your material of choice, then you can squeeze it out in a neat line, much like icing a cake with an icing bag and tip. They keep the mess down and, control the application of the material, and can then be thrown away when done. Works wonderfully.
Hinge Method
This one comes from Wayne Hicks. This is a neat way of gluing foam together nice and even. The problem is that if epoxy gets above the surface, it's difficult to sand down smooth without hurting the foam. So comes along the hinge method that allows epoxy to be applied and kept level with the foam. Here's how it's done.
This one comes from Wayne Hicks. This is a neat way of gluing foam together nice and even. The problem is that if epoxy gets above the surface, it's difficult to sand down smooth without hurting the foam. So comes along the hinge method that allows epoxy to be applied and kept level with the foam. Here's how it's done.
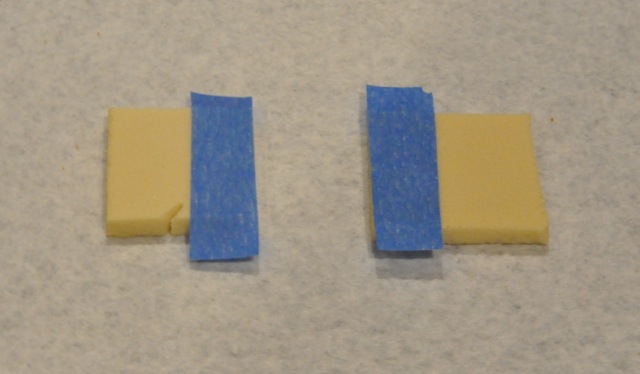
- Lay the pieces of foam butted together as they will be when glued together.
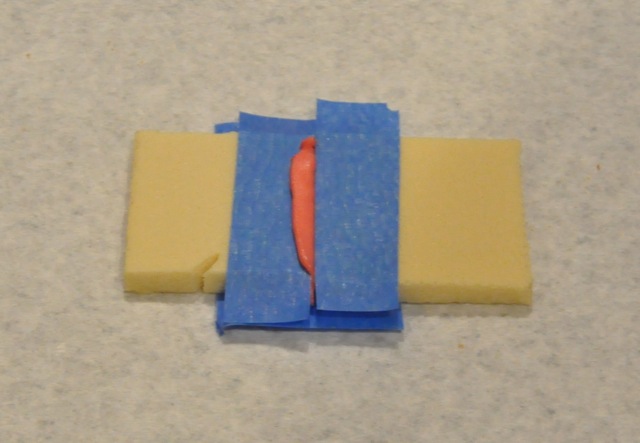
- Place a piece of packing tape across the seam so that tape is on both pieces of foam. Press the tape into the foam well to make sure it's well sealed.
- On the other side of the foam, place tape on both sides of the seam but do not overlap. This is to protect the foam surface when excess epoxy is squeezed out. Make sure it's pressed well in place as well.
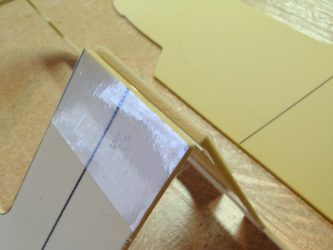
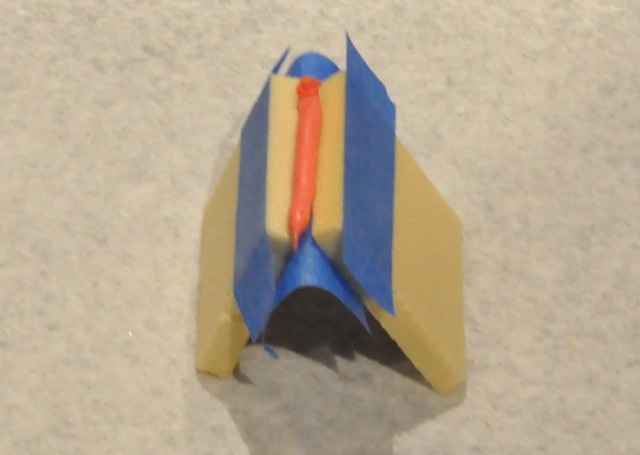
- Open up the seam like a hinge (see image to the right). The tape on the bottom holds the piece together and holds the epoxy in and will make it flush with the bottom.
- Mix up enough 5 min epoxy to run a bead across the entire length of foam that needs to glue together. Have a plastic sandwich bag with the tip cut out ready to go. When the epoxy is mixed, add it to the plastic bag, squeegee towards the cut corner, then use it squeeze a bead of epoxy in the joint.
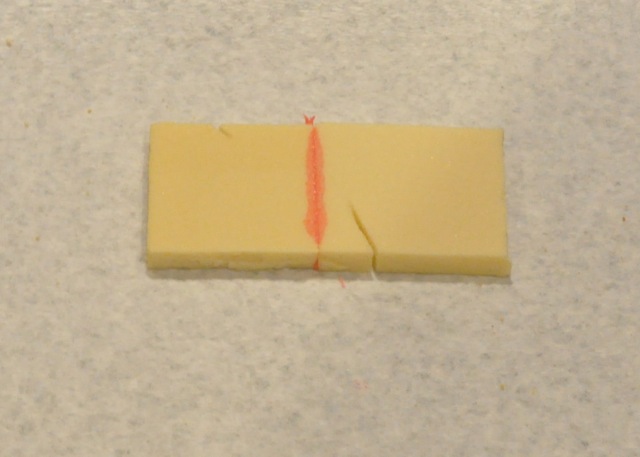
- Flatten the piece to squeeze the epoxy through the joint, then wipe off any excess that squeezes out. Remove the top two pieces of tape soon after wiping off the excess. Wipe off any further excess that's present on the surface.
- Leave the tape on the backside until the epoxy cures, then remove.
- You will have epoxy that is even with the foam surface on both sides with no need to sand flush.
The following images are to illustrate the method described above. I used blue painters tape and red icing to highlight the process better. I don't recommend using painters tape for the real thing... or red icing... or any icing for that matter.


Dry Wall screws (Or Composite Clecos)
This is a nice tip from Wayne Hicks. Dry wall screws have a low body profile, but a nice wide threading. This allows them to grab onto the foam rather well. They can be used to temporarily hold foam together while assembling parts or to hold down to a jig and leave a minimal amount of damage after removal. The hole left is easily filled with micro afterwards. You can get a large box for not much money and they're reusable. I also find that dry wall screws work well for screwing together jigs. When screwing to wood, make sure to drill a small pilot hole (1/8 inch works well for standard 1.25 inch dry wall screws).
This is a nice tip from Wayne Hicks. Dry wall screws have a low body profile, but a nice wide threading. This allows them to grab onto the foam rather well. They can be used to temporarily hold foam together while assembling parts or to hold down to a jig and leave a minimal amount of damage after removal. The hole left is easily filled with micro afterwards. You can get a large box for not much money and they're reusable. I also find that dry wall screws work well for screwing together jigs. When screwing to wood, make sure to drill a small pilot hole (1/8 inch works well for standard 1.25 inch dry wall screws).
Finishing Nails
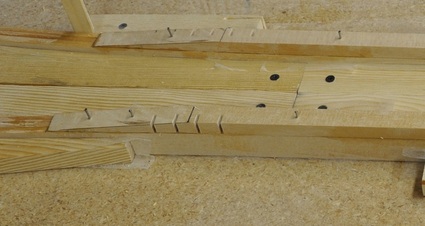
For some objects, I found it easier to hold down something using finishing nails. These are thin nails with a small head so that they don't leave much damage. Again, they can be bought in large supply for not much and work well for a variety of uses. Good to have around in case you can't get a screw into a location. I used them for holding down the longeron doublers in place (leave a much smaller hole than regular nails) and for holding down foam to the jigs. For wooden objects, you drill a hole slightly smaller than the nail so it will have some holding force when driven in. Always leave enough exposed so you can pull the nail up with pliers when it's done the needed job. For foam, you can just tap one in. I use a second nail to help drive the first one just slightly below the surface to get better hold of the foam and not interrupt the glassing process. When your done you just pull the nail out the other way or just pull up on the foam. The hole will be very similar to the nail body size, which is minimal, and involves a lot less foam repair than 5 min epoxy would create.
For some objects, I found it easier to hold down something using finishing nails. These are thin nails with a small head so that they don't leave much damage. Again, they can be bought in large supply for not much and work well for a variety of uses. Good to have around in case you can't get a screw into a location. I used them for holding down the longeron doublers in place (leave a much smaller hole than regular nails) and for holding down foam to the jigs. For wooden objects, you drill a hole slightly smaller than the nail so it will have some holding force when driven in. Always leave enough exposed so you can pull the nail up with pliers when it's done the needed job. For foam, you can just tap one in. I use a second nail to help drive the first one just slightly below the surface to get better hold of the foam and not interrupt the glassing process. When your done you just pull the nail out the other way or just pull up on the foam. The hole will be very similar to the nail body size, which is minimal, and involves a lot less foam repair than 5 min epoxy would create.
Soldering Coax To Copper Foil
At some point, you will have to make your antennas (how awesome is it that we can even make our own antennas!). There's not a lot of information on how to do the actual soldering, so people are left to figure it out on their own. So here's what I found worked well for me. Use 60/40 electrical solder for best results.
At some point, you will have to make your antennas (how awesome is it that we can even make our own antennas!). There's not a lot of information on how to do the actual soldering, so people are left to figure it out on their own. So here's what I found worked well for me. Use 60/40 electrical solder for best results.
- Strip your coax cable keeping the shield and the core wire the same length. Make sure to leave enough insulation around the core so the shield can't make contact with it. Important note here is to keep the wire clean, so wearing gloves wouldn't hurt here. You also want to minimize the amount of separation between the shield and core wire.
- Twist the shield together into one bunch. This will make a stronger connection and help hold everything together.
- Bend the wires so that when you put the cable down in it's location the wires that you'll be soldering are pushing into the surface. This will help them to hold in place and won't try to lift up when you remove the heat.
- Heat your soldering iron fully. Clean the tip off on a slightly damp sponge. Melt some electrical solder onto the tip to prep it.
- I found that pre-soldering the shielded wire helped, so go ahead and coat it with solder.
- Make sure the wires are where you want them and that they are pressing into the foil. Place the soldering iron on top of the wire and feed the solder into the joint area. The core should solder to the foil fairly easily and quickly. The shielding will take some doing because there's more mass there. Keep feeding solder till you see it flow onto the foil and wire. Watch out that you don't burn the foam underneath.
- Slowly remove the iron and allow the joint to cool naturally (don't speed it up). The joint should remain smooth and shiny.
- After fully cooling, check the joint by pushing on it. It should be stuck with no sign of give. Last thing you want is a cold joint that breaks later on, so better to test it now.
- Check your electrical connections using a multimeter with a diode function and make sure you get conduction along the same path (foil to wire, wire end to wire end) and check that there are no cross connections between the core and the shield.
